XMap ShapeFile Importer Help
<<Back to Main PageLaunching Program
To launch the program, go to the start menu and fin the installation (usually Start -> TSQMadness -> DeLorme Shapefile Importer). XMap does not have to be runnnig, but does need to be installed on the system.
Select Folders
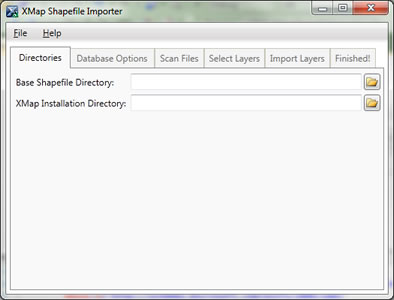
On the first tab you will be given two entry boxes. The first entry box ("Base Shapefile Directory") is the root folder that contains subfolders of shapefiles. The program will start scanning this folder, and scan all directories contained within this folder for .SHP files for importing.
The second directory is for loacing the installation of XMap. (Usually C:\Program Files\DeLorme\XMap\ or C:\Program Files (x86)\DeLorme\Xmap\ on 64-bit systems.)
To select the directory, either click on the Folder button, or double-click the textboxes. Once the proper directories are selected, the second tab will become enabled.
Database Configuration
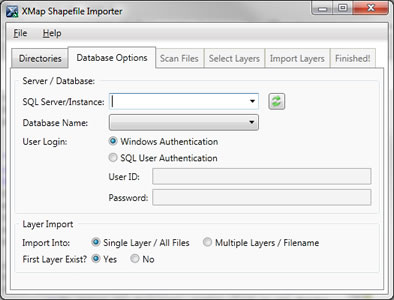
The second tab is where you set up database options and layer importing options. The settings on this page are as follows:
- SQL Server / Instance: You can either manually type the SQL Server instance, or click the refresh button to obtain a list of browsable SQL Servers available on the network. If manually typing a database server, you must follow the standard instance naming convention, such as "LOCALHOST\SQLEXPRESS" or ".", or "SERVER1\XMAP7"
- Database Name: After entering in a SQL Server Instance to connect to, click on the database dropdown to get a list of available databases that exist in the server. (Databases listed are all databases in the system, not necessarily databases that the user, configured below, can access.) If you get an error message trying to get a list of databases, check your user settings below.
- User Login: Select whether to use Windows Authentication (current logged-in user), or SQL Server Authentication to connect to the database as.
- Import Into: This specifies how to import the found shapefiles. The first option, "Single Layer / All Files" will import all the items into a single layer name in the database. The second option, "Multiple Layers / Filename" will groups all similarily-named files for selection of the layer name. (For example, if there are three files found total, two are both named "Pipelines.shp" - located in different directories - and one is named "Powerlines.shp", then inm nthe next screen you will be able to specify the layername to put both "Pipelines" into, and a different layer name for "Powerlines".
- First Layer Exist? This specifies whether or not the layers that you're importing into already exist (start appending), or need to be created first (create, then append). Selecting 'Yes' means that all specified layers already exist in the database and append to them. Selecting 'No' means that each layer will be created the first time (deleting existing layers if they already exist) and then appended to.
Scan Shapefiles

Press the "Scan" button to scan for files. No changes are made at this time, the program is only scanning for all the shapefiles to get their names and locations. At this time, the program will throw an error if you do not have permission to the directory (or any subdirectory) specified in the first tab. The first step of the scan may take a while as the application is waiting for the operating system to return a list of all *.SHP files. After that, the program will sort and find unique names of the files before letting you continue on to the next tab.
If there were no shapefiles in teh directory specified, you will be forced to go back and input a different scanning directory.
Layer Names
Depending on the layer option you selected in the Database Layer configuration screen, you could get one of two screens here:
 Single Layer: If you selected Single Layer, enter in the layer name that you want all the files to be imported into. Note that how XMap works, different layer types will still be imported into seperate layers. (i.e. a Point Layer cannot contain Line objects.)
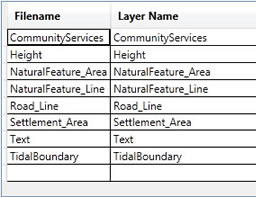 Multiple Layers: If you had selected multiple layers, you will be given a list of names. The names were taken from the unique filenames of the shapefiles. By default, layer names are set to the same as the unique filenames. If you wish to not import a set of items, empty the textbox. (For example, in the example to the right, if you do not with to import the "TidalBoundary" files, erase 'TidalBoundary' from the Layer Name column. You can also combine files this way, by typing in the same layer name for other files. (For example, in the above example if you would want the 'NaturalFeature_Area' files to be in the same layer as the 'Settlement_Area' files, simply give them both the same name.)
When finished assigning names, click the next tab.
Import Files
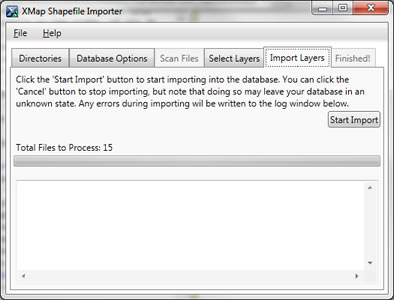
When you are ready to perform the import, click the 'Start Import' button. Importing will start, and you can watch the output from XMap's import program in the log under the progress bar. To cancel, click the cancel button, importing will stop after the current import is finished. The import process normally won't get interrupted so you should not be left with any corrupted data.
Menu Bar
The menu proved some basic commands:
- File -> Exit: Exits the program.
- Help -> Online Help: Takes you to this page.
- Help -> About: The About screen.